
Cisco AI Assistant
Building an AI-Powered Cisco Network Assistant with n8n, OpenAI, and Python Netmiko Query your Cisco IOS devices using plain English. No CLI knowledge required.

Building an AI-Powered Cisco Network Assistant with n8n, OpenAI, and Python Netmiko
Query your Cisco IOS devices using plain English. No CLI knowledge required.
What We're Building
A conversational AI assistant that lets network engineers type natural language queries like "show me all interfaces and their status" and get real Cisco device output back — automatically, securely, and without touching a terminal.
Sample Output:

The stack:
n8n — workflow orchestration and chat interface
OpenAI GPT-4o — natural language to CLI translation
Python + Netmiko — SSH execution on Cisco IOS devices
Ubuntu Linux — server runtime
How It Works — The Pipeline
User Chat Input
      ↓
n8n Chat Trigger        ← captures your message
      ↓
AI Agent + OpenAI       ← translates to Cisco CLI command
      ↓
Execute Command Node    ← runs Python script via shell
      ↓
Python + Netmiko        ← SSH into Cisco device, runs command
      ↓
Cisco IOS Switch        ← executes, returns output
      ↓
Chat Response           ← output displayed in chat window
Every step has a single job. Nothing overlaps.
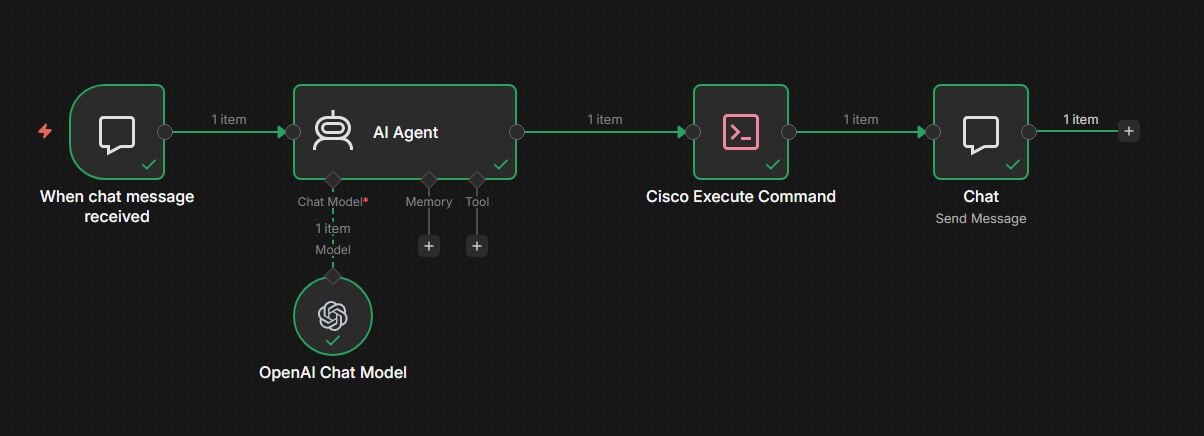
System Architecture
The 7 Stages
| # | Component | Technology | What It Does |
|---|---|---|---|
| 1 | Chat Trigger | n8n built-in | Captures your message from the chat UI |
| 2 | AI Agent | n8n AI Agent node | Orchestrates the model interaction |
| 3 | Language Model | OpenAI GPT-4o | Translates natural language → Cisco CLI |
| 4 | Execute Command | n8n Execute Command node | Shells out to the Python script |
| 5 | Network Connector | Python + Netmiko | Opens SSH session, runs command |
| 6 | Cisco Device | Cisco IOS Switch/Router | Executes CLI, returns output |
| 7 | Response Handler | n8n Chat node | Sends output back to chat window |
Section 1 — The n8n Workflow
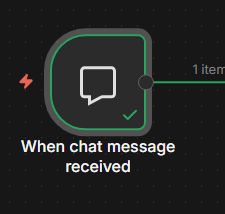
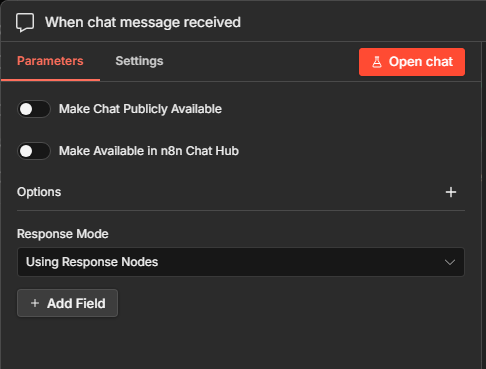
Node 1: Chat Trigger
The When Chat Message Received node is the entry point. It listens on the n8n built-in chat interface and fires the workflow every time you send a message. No configuration needed — just enable it and activate the workflow.
Node 2: AI Agent
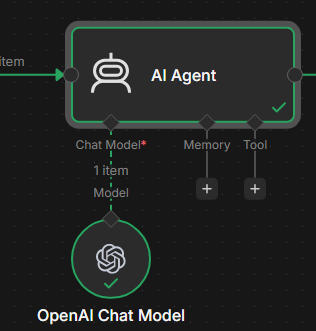
This is the decision-making node. It receives your message and uses OpenAI GPT-4o to produce a valid, read-only Cisco IOS command.
The AI Agent is the controller. The OpenAI Chat Model node is the brain. They work as a pair — the Agent manages the interaction, GPT does the understanding.
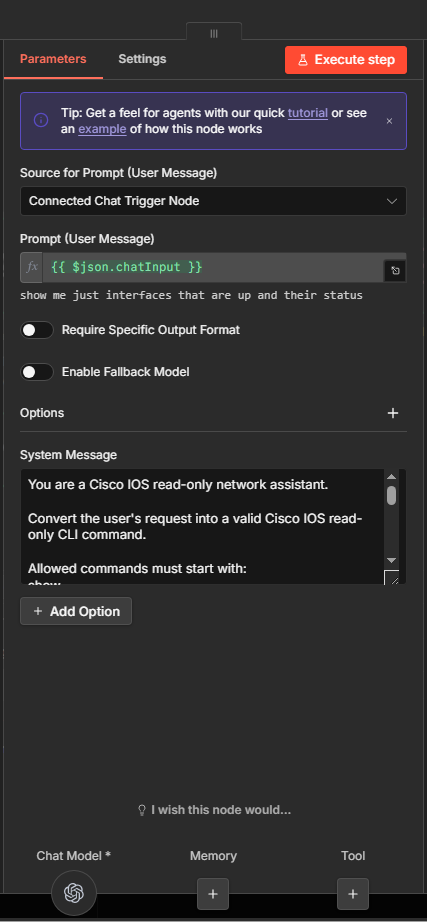
System prompt used:
You are a Cisco IOS read-only network assistant.

Convert the user's request into a valid Cisco IOS read-only CLI command.

Allowed command types:
  - show
  - ping
  - traceroute

Never generate configuration commands.
Return ONLY the command. No explanation. No markdown. No quotes.
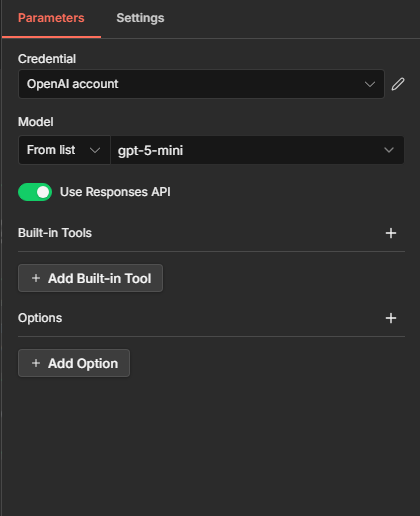
Node 3: OpenAI Chat Model
Attach this to the AI Agent as its model. Settings:
| Setting | Value |
|---|---|
| Model | gpt-4o |
| Temperature | 0 (deterministic — same input, same output) |
| Max Tokens | 256 |
| API Key | Stored in n8n Credentials |
Temperature 0 is important here. You want the model to produce the exact same command every time for the same query — not creative variations.
Node 4: Execute Command
This node shells out to the Python script, passing the AI-generated command as an argument.
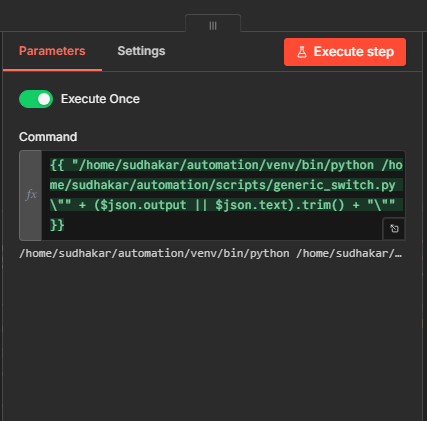
Expression used in the node:
{{ "/home/sudhakar/automation/venv/bin/python /home/sudhakar/automation/scripts/generic_switch.py \"" + (\(json.output || \)json.text).trim() + "\"" }}
Note:
\(json.outputor\)json.text— n8n uses different field names depending on which AI Agent version you're running. The||handles both.
Section 2 — The Python Script
This is where the real network work happens. The script validates the command, opens an SSH session, runs it, and returns the output.
import warnings
from cryptography.utils import CryptographyDeprecationWarning
from netmiko import ConnectHandler
import sys

warnings.filterwarnings('ignore', category=CryptographyDeprecationWarning)

if len(sys.argv) < 2:
    print('ERROR: No command received')
    exit(1)

command = ' '.join(sys.argv[1:])

ALLOWED_PREFIXES = ['show', 'ping', 'traceroute']

BLOCKED_WORDS = [
    'conf t', 'configure', 'reload', 'write', 'erase',
    'delete', 'format', 'copy', 'shutdown', 'no ', 'debug'
]

if not any(command.lower().startswith(x) for x in ALLOWED_PREFIXES):
    print(f'ERROR: Command not allowed -> {command}')
    exit(1)

if any(word in command.lower() for word in BLOCKED_WORDS):
    print(f'ERROR: Dangerous command blocked -> {command}')
    exit(1)

device = {
    "device_type": "cisco_ios",
    "host": "192.168.1.x",
    "username": "xxxxx",
    "password": "xxxxx",
    "secret": "xxxxx",
    "fast_cli": False,
    "use_keys": False,
    "allow_agent": False,
}

try:
    conn = ConnectHandler(**device)
    conn.enable()
    conn.send_command('terminal length 0')
    output = conn.send_command(command, read_timeout=120)
    print(output)
    conn.disconnect()
except Exception as e:
    print(f'ERROR: {str(e)}')
What Each Section Does
| Code Section | Purpose |
|---|---|
warnings.filterwarnings(...) |
Suppresses noisy deprecation warnings from the cryptography library |
sys.argv validation |
Ensures a command was actually passed — fails fast if not |
ALLOWED_PREFIXES |
Whitelist — command must start with show, ping, or traceroute |
BLOCKED_WORDS |
Blacklist — any match causes immediate exit(1) |
device dict |
SSH connection parameters for the Cisco device |
ConnectHandler(**device) |
Opens the SSH session via Netmiko |
conn.enable() |
Enters privileged EXEC mode |
terminal length 0 |
Disables pagination so full output is returned at once |
send_command(command) |
Executes the validated CLI command |
conn.disconnect() |
Cleanly closes the SSH session |
⚠️ Production note: The credentials above (
admin/admin123) are for lab use only. In production, use SSH key authentication, TACACS+ or RADIUS, and ACL-restricted VTY lines.
Section 3 — Cisco Device SSH Setup
Before Netmiko can connect, SSH must be enabled on the Cisco device. Run this on the device:
! Enable SSH
hostname CiscoSwitch
ip domain-name lab.local
crypto key generate rsa modulus 2048

! Create local user
username admin privilege 15 secret admin123

! Configure VTY lines
line vty 0 4
 transport input ssh
 login local

! SSH version 2
ip ssh version 2
ip ssh time-out 60
ip ssh authentication-retries 3
Verify SSH is active:
show ip ssh
show users
Section 4 — Installation Guide
Prerequisites
| Requirement | Minimum |
|---|---|
| OS | Ubuntu 22.04 LTS |
| Python | 3.8+ |
| Node.js | 18.x+ |
| Network | Port 22 open to Cisco device |
| OpenAI | GPT-4 API key |
| RAM | 2 GB (4 GB recommended) |
| Disk | 10 GB free |
Step 1 — Update the system
sudo apt update && sudo apt upgrade -y
Step 2 — Set up Python virtual environment
# Create directory structure
mkdir -p ~/automation/scripts

# Create and activate venv
python3 -m venv ~/automation/venv
source ~/automation/venv/bin/activate

# Install libraries
pip install netmiko paramiko

# Verify
pip show netmiko paramiko
Step 3 — Deploy the Python script
nano ~/automation/scripts/generic_switch.py
# Paste the script from Section 2

chmod +x ~/automation/scripts/generic_switch.py

# Test it (device must be reachable)
~/automation/venv/bin/python ~/automation/scripts/generic_switch.py "show version"
If SSH is working, you'll see the Cisco show version output in the terminal.
Step 4 — Install n8n
sudo npm install -g n8n pm2

pm2 start n8n
pm2 startup
pm2 save

pm2 status
Step 5 — Access n8n
Open your browser and go to:
http://<your-server-ip>:5678
Complete the setup wizard and create your admin account.
Step 6 — Add OpenAI credentials
Go to Settings → Credentials → Add Credential
Select OpenAI API
Paste your API key
Save as
OpenAI API Key
Step 7 — Build the workflow
Create a new workflow
Add When Chat Message Received node
Add AI Agent node — connect to Chat Trigger
Add OpenAI Chat Model node — attach to AI Agent as model
Paste the system prompt from Section 1 into the AI Agent
Add Execute Command node — connect to AI Agent output
Paste the expression from Section 1 into the command field
Save and Activate the workflow
Section 5 — Safety & Security
This system uses six overlapping layers. Read-only is enforced by architecture, not just by policy.
Defense-in-Depth Model
| Layer | Control | What It Blocks |
|---|---|---|
| 1 | AI System Prompt | Instructs GPT to never generate config commands |
| 2 | Allowlist prefixes | Rejects anything not starting with show, ping, traceroute |
| 3 | Blocklist keywords | Blocks configure, reload, write, erase, delete, no, debug |
| 4 | Pagination control | terminal length 0 prevents output hangs |
| 5 | SSH authentication | Username/password (or key-based) access control |
| 6 | Python virtual environment | Isolates dependency blast radius |
Full Blocked Command Reference
| Keyword | Risk | Example |
|---|---|---|
configure / conf t |
Enters config mode | configure terminal |
reload |
Reboots device | reload |
write |
Saves config | write memory |
erase |
Wipes config | erase startup-config |
delete |
Deletes files | delete flash:vlan.dat |
format |
Formats storage | format flash: |
copy |
Config transfer | copy running startup |
shutdown |
Kills interface | interface gi0/1; shutdown |
no |
Removes features | no ip route 0.0.0.0 |
debug |
CPU overload risk | debug ip routing |
Section 6 — Usage & Example Queries
Once the workflow is active, open the chat and start querying:
| What you type | Command generated |
|---|---|
| Show me all interfaces and their status | show interfaces |
| What is the current routing table? | show ip route |
| Display all BGP neighbors | show bgp neighbors |
| Check device uptime and version | show version |
| Show active CDP neighbors | show cdp neighbors detail |
| What VLANs are configured? | show vlan brief |
| Ping 8.8.8.8 to test connectivity | ping 8.8.8.8 |
| Show the running configuration | show running-config |
| Display OSPF neighbors | show ip ospf neighbor |
| Check GigabitEthernet0/1 errors | show interfaces GigabitEthernet0/1 |
Test Scenarios
Test 1 — Normal query
Input:   "Show me the version of this device"
Command: show version
Result:  Cisco IOS version output in chat ✅
Test 2 — Blocked command attempt
Input:   "Configure VLAN 100 on this switch"
Layer 1: GPT refuses (system prompt blocks config commands)
Layer 2: If bypassed, Python catches "configure" keyword
Result:  ERROR: Dangerous command blocked -> configure terminal ✅
Test 3 — Connectivity test
Input:   "Ping the gateway at 192.168.1.1"
Command: ping 192.168.1.1
Result:  Cisco ping results with success rate in chat ✅
Section 7 — Troubleshooting
| Error | Likely Cause | Fix |
|---|---|---|
| SSH Connection Refused | SSH not enabled or port 22 blocked | Run ip ssh version 2 on device, check firewall |
| Authentication Failed | Wrong credentials in device dict | Verify username/password/secret in script |
| Command Timeout | read_timeout too low |
Increase read_timeout in send_command() |
| OpenAI API Error | Bad key or quota exceeded | Check n8n credentials and OpenAI billing |
| ERROR: Command not allowed | GPT returned unexpected command | Tighten the system prompt |
| Workflow not triggering | Workflow deactivated or PM2 stopped | Activate in n8n, run pm2 restart n8n |
| Python script not found | Wrong path in Execute Command node | Verify the file path in the expression |
| Output truncated | terminal length 0 not applied |
Check that conn.enable() succeeds first |
Section 8 — Future Roadmap
Phase 1 — Multi-device (High Priority)
Support a device inventory with multiple Cisco devices
Route queries to the correct device based on context
Store inventory in SQLite or PostgreSQL
Phase 2 — Multi-vendor (Medium Priority)
Palo Alto — add PAN-OS support via
pan-os-pythonArista EOS — add support via
eAPIorpyeapiAI tool selection — let the AI Agent auto-select vendor script
Phase 3 — Intelligence (Medium/Low Priority)
CMDB integration — query ServiceNow or NetBox for hostname resolution
Topology mapping — auto-generate diagrams from CDP/LLDP data
Troubleshooting playbooks — pre-built workflows triggered by natural language
Phase 4 — Integrations (Low Priority)
Slack bot — expose the assistant via Slack
Microsoft Teams bot — n8n webhook integration
Appendix
Directory Structure
/home/sudhakar/
├── automation/
│   ├── venv/
│   │   └── bin/
│   │       └── python
│   └── scripts/
│       └── generic_switch.py
└── .n8n/
    ├── config
    └── database.sqlite
Environment Variables (Production)
Move sensitive values out of the script and into environment variables:
# Add to /etc/environment or ~/.bashrc
export CISCO_HOST=192.168.1.100
export CISCO_USER=admin
export CISCO_PASS=<your-password>
export CISCO_SECRET=<your-enable-secret>
export OPENAI_API_KEY=....
Then update the device dict in the script:
import os

device = {
    "device_type": "cisco_ios",
    "host": os.environ["CISCO_HOST"],
    "username": os.environ["CISCO_USER"],
    "password": os.environ["CISCO_PASS"],
    "secret": os.environ["CISCO_SECRET"],
    "fast_cli": False,
    "use_keys": False,
    "allow_agent": False,
}
PM2 & n8n Quick Reference
| Task | Command |
|---|---|
| Start n8n | pm2 start n8n |
| Stop n8n | pm2 stop n8n |
| Restart n8n | pm2 restart n8n |
| View logs | pm2 logs n8n |
| Check status | pm2 status |
| Activate venv | source ~/automation/venv/bin/activate |
| Test script | ~/automation/venv/bin/python ~/automation/scripts/generic_switch.py "show version" |
| n8n web UI | http://<server-ip>:5678 |
| Test SSH | ssh admin@192.168.1.100 |
Wrapping Up
What makes this setup powerful is the clean separation of concerns:
GPT handles language understanding — it reads intent, not keywords
n8n handles orchestration — it connects everything without custom glue code
Python handles device access — SSH, validation, and output retrieval stay isolated
Safety is layered — the AI prompt, the allowlist, and the blocklist all work independently
The result is a network assistant that's fast to use, safe to run, and straightforward to extend. Adding a new vendor means adding one Switch case and one Python script — nothing in the shared pipeline changes.
Author: Sudhakar · v1.0 · May 2026